
|
We photographers love our gear. We dream of camera bags brimming with the latest, priciest gadgets. The gear can run upwards of a mortgage payment, but sometimes right tools in your junk drawer. Check around your house, I bet you can fill out the gear without a trip to the store!
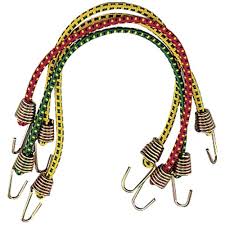
-A small mirror is an excellent reflector for outdoor shots. It can open deeply shadowed areas to create bold fill. A cheap acrylic one like you can find at a dollar store on won't shatter in the field. -Garbage bags protect gear when the mother nature decides its time to get wet. (Cut 3 holes and you got a poncho). Use them in lighting setups-white bags as reflectors; black ones is like blocking flags. -A Flashlight is a no-brainer. You need one when you're fumbling with you tiny camera controls in Twilight. Their aesthetic tools as well; create a delicate light painting with the penlight, or dramatic background pattern with broad-beamed light. Don't want to hold the light get a LED headlamp. -Ziplock bags are perfect impromptu weather housings (poke a hole and rubber band around it round your lens), and they keep dust off lenses and backup bodies in your bag. -Mini bungee lash tripod legs and fix broken camera straps. Bring lots so you can daisychain them into longer straps. -Gaffers tape will save those sessions when everything from your hiking boot soles to your focusing ring falls apart at once. -Micro screwdriver sets can help you fix your tripod head, and other small screws on your equipment as well as your eyeglasses.. -White paper cups make fantastic impromptu snoops if you cut out their bottoms, or even lined them with black tape to mount them as a backup lens shape. -A white paper plate is the poor photographers ring light. Cut a hole in it and tape it to your lenses reflector for backlit close-ups and facial portraits or tapes of foil, shiny side down, to the plate to make it extra-bouncy reflector. -A small spray bottle can make morning dew of foliage and flowers and mother nature hasn't done her job, and put a sheen on models faces and skin. -An eyedropper and glycerin give you a droplet control place drops of glycerin precisely where you want them on a pedal or twig perhaps, and the sticky globs will wait for you compose and focus.
0 Comments
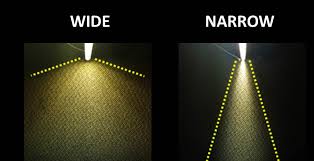 Learning the Finder Points of Illumination Any photographer worth her of his lens cap knows a thing or two about light. To be considered in those ranks, all you need to do is master a few basics First, remember that the broader the light source, the softer the light it emits will be. The narrower the source, The harder it's like will be Broad light reduces shadow in contrast and suppresses distracting texture because it's raising the subject from many directions ( which is why it's beloved for flattering portraits). A corollary: closer that the light source is to the subject, the softer dislike will be, because a light source is brought in relation to the subject. The converse holds true as well as you shift the light away from the subject, speed narrows in the light that a cast is harsher and harder. Such light plays of texture (as well as flaws) of and is an excellent choice for greedy, moody photos. Playing with Illumination: Ask a portrait subject to suit your large window to make the most of it in direct sunlight. A window with a good light is a no-cost softbox. Move lamps closer and farther away from subjects into you found the most flattering illumination. Place a light sourced the side of fluffy pets to bring up the softness and texture are their fur. Aim of your flash head backward that bounces it off appeal wall behind yourself for a natural looking diffusion when you shoot in a small room. Till next time. Happy Clicking Lance AuthorWrite something about yourself. No need to be fancy, just an overview.  Well as I mentioned last we talked. Today we're going to talk about Scene mode, White Balance, and Auto Bracketing.
1. Scene mode: This setting on your camera includes many settings for specific subjects. Portrait mode instructs the camera to use a short exposure but switches off the flash, or for example; in foliage mode the color saturation is amped up and sets a small aperture. 2. White balance: Choosing Auto White Balance lets the DSLR define how white areas will appear in specific lighting conditions, and corrects the other colors accordingly. But you should alway consider setting White Balance manually when shooting in mixed light conditions. 3. Autobracketing: When you're unsure what exposure will work best, employ the auto bracketing function to fire off serval quick shots at varying exposures with a single shutter press. Next time, Live view mode, Burst mode and Color-quality settings. Till then, Happy Clicking. Lance Hi all, I normally would not ask this. But a Gofundme page has been setup for my best friend brother who was just diagnosed with Multiple Myeloma, a blood cancer. If you feel inclined I know any donations would be welcome. Thank you for your time!
https://www.gofundme.com/brians-medical-bills |
AuthorI'm a photographer who loves animal photography. Trying to capture that perfect moment is a passion of mine. Archives
October 2017
Categories
All
|


 RSS Feed
Proudly powered by Weebly